
Hugin tutorial — Stitching Multi-row photos together
This tutorial covers a more complex application of Hugin, taking two rows of handheld photographs and stitching them together into a single image, using the automated Assistant. The same process can be applied to more than two rows.
You will need a control point generator such as autopano-sift-C installed to do this fully automated panorama generation.
Note: This tutorial is based on the 0.7.0 version of Hugin. Although your version may differ, the underlying principle will remain the same
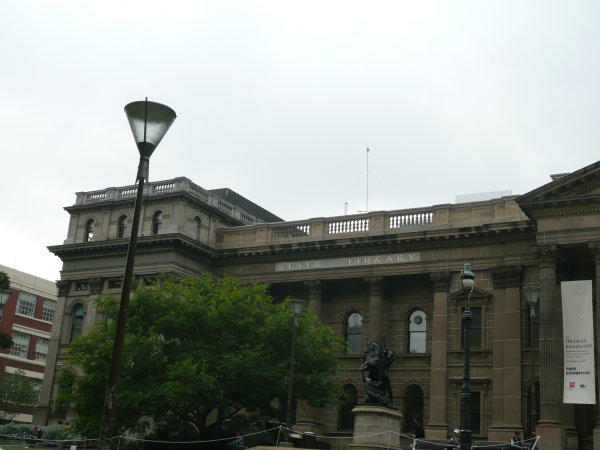
Below is a group of photographs that were taken of the State Library of Victoria, Swanston Street Melbourne.
You can download these images (p986.jpg p987.jpg p988.jpg p989.jpg p990.jpg p991.jpg p992.jpg, and p993.jpg) and try it yourself.

This set of photos serves as a good example of how Hugin can stitch and blend multiple rows of photographs into a panorama, as there are some unusual complications:
- The number of pictures in each row is different.
- The camera has been left on auto exposure meaning that the brightness of the photographs varies by two stops between the darkest and lightest shots.
- The camera was hand-held, meaning that the photos move up-and-down within each row.
- There is some parallax error caused by the camera physically moving a small distance between some shots.
Start by launching Hugin, and using the Assistant tab select the 1. Load images... button to select all the images in the project.
Tip: you can select multiple images in the file dialog box or drag and drop files from a suitable file browser.
Select the 2. Align... button and the autopano program will commence to find common points (control points) in all the overlapping areas of the images.
When the autopano program has completed the control point matching, Hugin will align the images by adjusting positions and correcting exposure, it will then open the preview window.

Hugin may have set the projection to Panorama (Cylindrical), but for a project of this nature it is best to set the projection to Rectilinear. You may want to try different projections to see the effect.
You can now close the preview window and select the 3. Create panorama... button. When completed you will be asked where you want to save your project files and for a name for the final stitched image, which is shown here.

Hugin has made quite a good job of stitching and blending the images, in fact it did a far better job of it than I was able to do by manually selecting the control points. Hugin is more rigorous than many of us and is likely to select many more control points thus ensuring a good outcome. The final result would be improved if the 'holes' at the top RH and at the front had been covered, but the image is still able to be cropped whilst retaining the library building and most of the entrance steps.
When attempting a multi-row panorama it may help to check how the images will overlap, and if possible, find the best focal length to ensure good scene coverage and photo overlap before attempting to take the photos. Doing this will also help in setting up a visual plan in your mind for the coverage of the subject.
For a subject where the number of rows exceeds two it could become difficult to keep track of your image locations and it may help to make a rough drawing of the layout of the photos which you can use to see where each shot needs to be to ensure you don't end up with holes in your panorama.
If you were to attempt to do this manually, follow the principles in the Two-Photos tutorial, but when adding control points ensure that you do so for all side-to-side and above-below photo overlaps, as shown in this diagram.

The resulting panorama could now have perspective correction applied, using the methods described in the perspective tutorial.
This tutorial and photos by Terry Duell April 2008