
Hugin tutorial — Perspective correction
This tutorial covers a basic use of Hugin — Using both horizontal and vertical control-points to remove all perspective effects from a photograph.
Note: This tutorial is based on the May 2008 beta version of Hugin 0.7, although your version may differ, the underlying principle will remain the same.
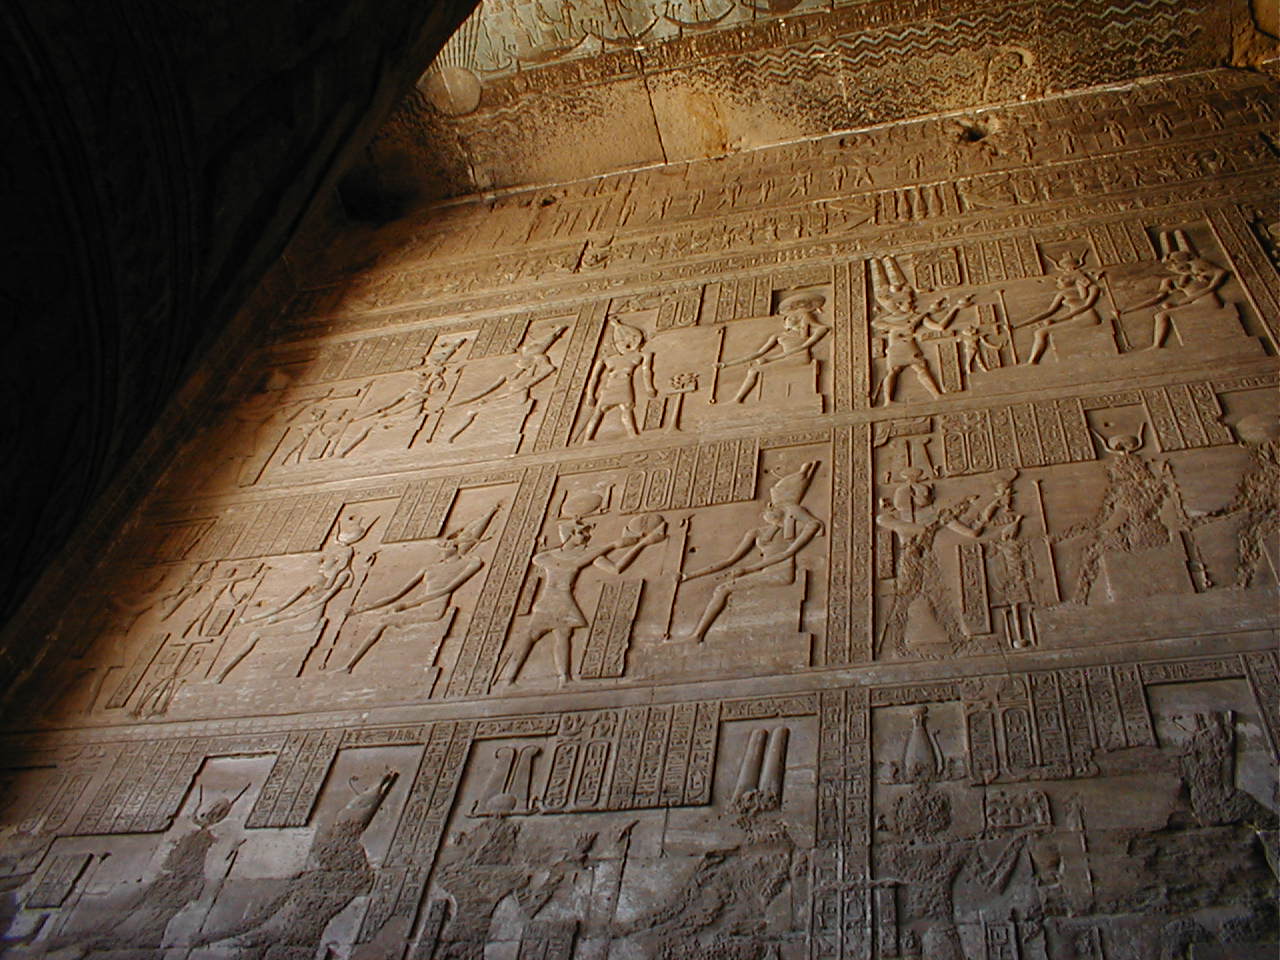
Here is a picture taken from an awkward angle, it is not possible to photograph the wall straight-on because the room is filled with columns:
You can download this photograph (311.jpg) and try following the tutorial yourself.
Here is the same picture with the perspective corrected, the technique is accurate enough for high quality surveying of real-world buildings:

Start by launching Hugin, use the Assistant - 1. Load images... button to select the image you want to adjust.
The optimisation process needs to start with credible description of your camera, particularly for the lens field of view. The example image doesn't have lens field of view in its metadata, so the Camera and Lens data dialog box opens to allow you to enter required data. Make sure that something like 50 degrees is entered in the HFOV (v) text box, then click OK.

Tip: Hugin can normally estimate this value by looking at the EXIF data in the photograph, so you shouldn't have to set it manually.
By default, Hugin assumes that you intend to create a full 360 degree equirectangular panorama, but in this case you need to remap the output to the same rectilinear format as the input image.
In the Stitcher tab change the projection (f) to Rectilinear.

Switch to the Control points tab, this is where you are going to input all the information the software needs to calculate the exact lens field-of-view, correct lens barrel-distortion and re-align the perspective.
Notice that there are two identical images side by side, each pair of control-points that you set involves selecting a related horizontal or vertical feature, and locating the end points, one end point in each image.
Make sure that Zoom is set to fit to window and that both Auto fine tune and Auto add are set.

Now you can use the mouse to select control points; pick a vertical feature that you can see in both the left and right-hand window and click on one end of it in one window and the other end in the second window.
Tip: where the auto fine tune doesn't find a good match, you will need to zoom in to 100% and adjust the position of one of the points by dragging it to the right location.
Notice that Hugin is clever enough to detect that you are selecting a vertical feature and will automatically set the mode: to Vertical line. If Hugin sets the control point to normal, select the control point (e.g the line highlighted in blue) and then click on mode: and select vertical line or horizontal line.
You need to repeat the process to get a good selection of both vertical and horizontal control points, try and get some towards the middle of the image as well as at the edges. The picture below shows the pairs of points used in this tutorial highlighted by painting lines in the Gimp image editor:

Now select the Optimizer tab.
If you are lucky you will be able to select Optimize Positions, View and Barrel (y,p,r,v,b), hit Optimize Now! and finish the optimisation process in one go.
Otherwise, if the optimiser reduces the field of view to zero, you will find that you have to just Optimize Positions first, before you can optimise the other parameters.

When it is done you will need to Apply the changes.

Check the output in the preview window (press the Ctrl P combination to launch the preview window, or select the Preview panorama icon, third from the right end of the icons along the top of the window.).
Switch to the Stitcher tab and use the Calculate Field of View and the Calculate Optimal Size buttons to fix these values automatically.
You should select a lossless output image format such as PNG or TIFF since the output probably needs to be cropped in an image editor immediately anyway.
Advanced techniques
Other things you might want to experiment with are:
Using this technique on a photo of a very regular grid, such as a modernist building, is a very good way to calibrate a camera and determine the lens characteristics for later use.
Sometimes there are not enough available lines in the photo to be able to optimise all the parameters at once. In this situation it is useful to know the Field of View and the lens correction parameters before you start. You could save and load calibrated parameters for your lens or use a tool such as lensfun or PTLens to discover them for you.
This tutorial is based on a single source image, however you can use an unlimited number of overlapping source images and stitch them with 'normal' control points at the same time as creating the 'horizontal' and 'vertical' control points.
An obvious use for this technique is to create tileable textures for 3d modelling applications. This further tutorial for Fixing Lighting Irregulaties in Self-Tiling Maps can be applied just as easily to the tools in the Gimp image editor.
Another useful tool for creating tileable textures is the Resynthesizer Gimp plug-in.
If you do create such textures, consider licensing them under a Creative Commons Share Alike license and/or the GNU General Public License so others can make use of them too.
The source images don't need to be rectilinear photographs taken with a normal lens, you can just as easily use any lens type supported by Hugin such as a fisheye. Though the output does need to be rectilinear, which limits the practical field of view to a maximum of something like 120-140 degrees.
About this image
The photograph used in this tutorial is of a section of interior wall of the pronaos (outer hypostyle hall) in the temple of Hathor at Dendera, Egypt. It was constructed during the Ptolemaic and Roman periods, the lower sections were defaced by early christian iconoclasts.

Further examples
This Victorian tiled floor has lots of straight lines allowing plenty of pairs of control points. There were enough control points to allow optimisation of all lens parameters to produce an extremely accurate result. Notice that there is significant vignetting where the centre of the image is brighter than the edges, this could have been corrected by Hugin if the lens had been calibrated first.
Note that due to the large rotation of the source photograph, Hugin was unable to automatically determine horizontal from vertical control points for some pairs, these had to be set manually:


This Art Deco panel high on the facade of a cinema was photographed with a telephoto lens. Long lenses tend not to suffer from barrel-distortion or vignetting, so only the camera orientation needed to be adjusted:


This medieval church floor isn't exactly flat and the lines are not very straight. Even so, it is still possible to get a good result:


This elevation of the Capitoline Museum was stitched from four photographs and perspective corrected at the same time.

Related links
The Simulating an architectural projection tutorial shows how to use just vertical control points to remove one degree of perspective.
The panotools wiki has more information on Perspective Correction.
Author Bruno Postle - Created July 2005, updated for Hugin 0.7 by Terry Duell June 2008